01422 487273     sales@dakota.co.uk

Installation Guides

INSTALLATION OF DECKING BOARDS
Fitted on composite plastic joist supports on concrete, gravel or pedestals

See our brochure for details about Dakota pedestals for supporting joists

COVERING EDGES

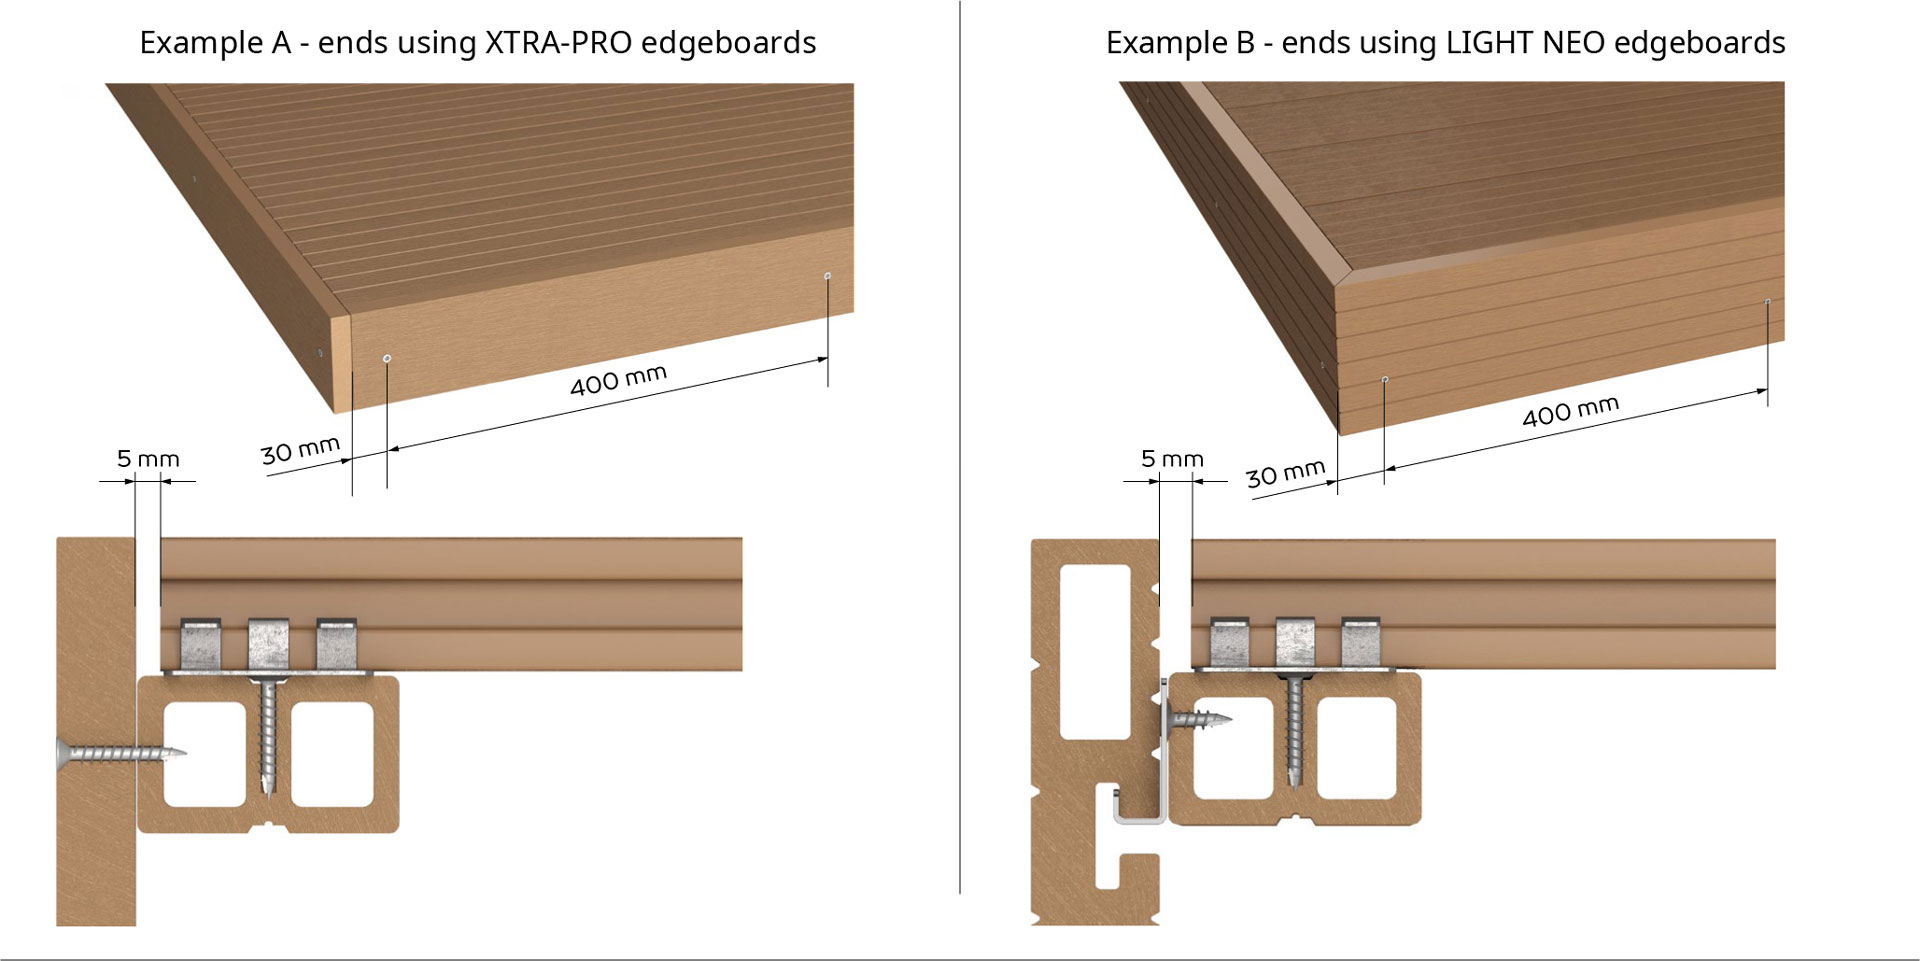
Edgeboards are available to cover the edges of your deck and to give it a tidy and professional finish.

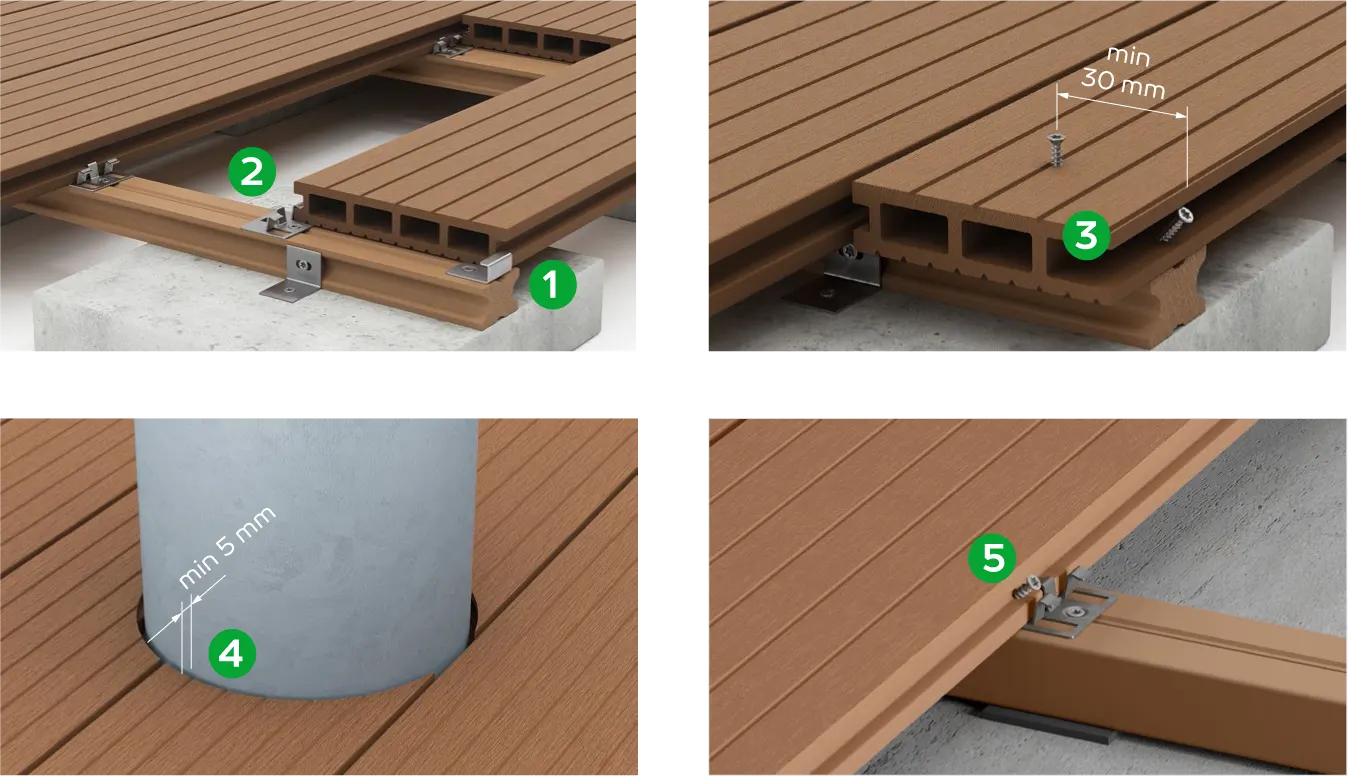
Fixing screws must be used every 400mm. The joints of an edgeboard must have a 5mm space and the minimum distance of a fixing screw from the edge must be 30mm.
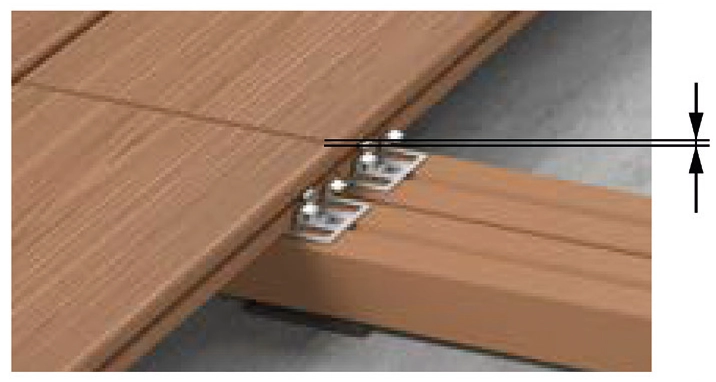
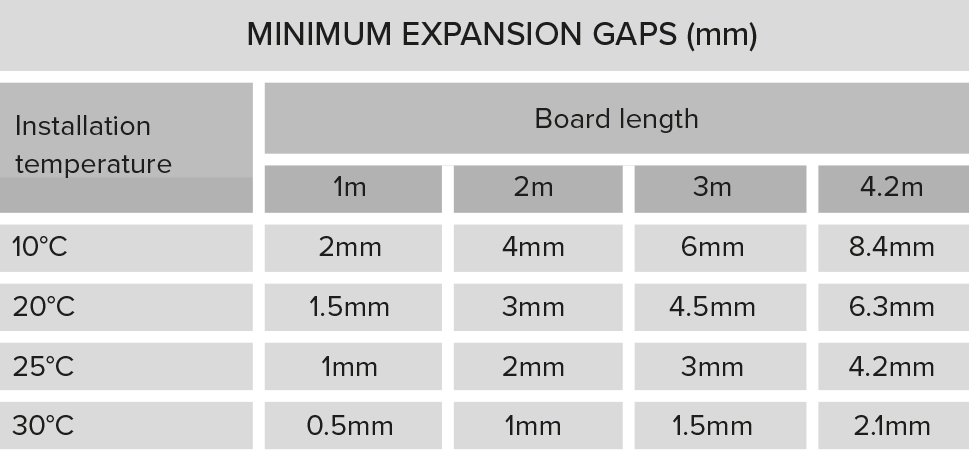
EXPANSION GAPS

Depending on the outdoor temperature, expansion gaps should be left at the joints.

CUTTING

To cut WPC, regular wood cutting devices are suitable. Large tooth saw blades should be avoided. When cutting aluminium beams, use a suitable fine tooth metal saw.

MATERIALS & WORK EQUIPMENT

Required materials:

  • Decking boards
  • Starter clips
  • Fixing clips
  • Screws


Work equipment:

  • Cordless drill
  • Saw
  • Pencil
  • Beams
STORAGE

Avoid dragging and throwing the boards while loading and storing. Decking boards should be stored horizontally on their flat surface, preferably in their original packaging, on a dry and level surface or on 50mm wide wooden poles with spacing not exceeding 500mm. Store in  a well-ventilated room.

BASE CONSTRUCTION

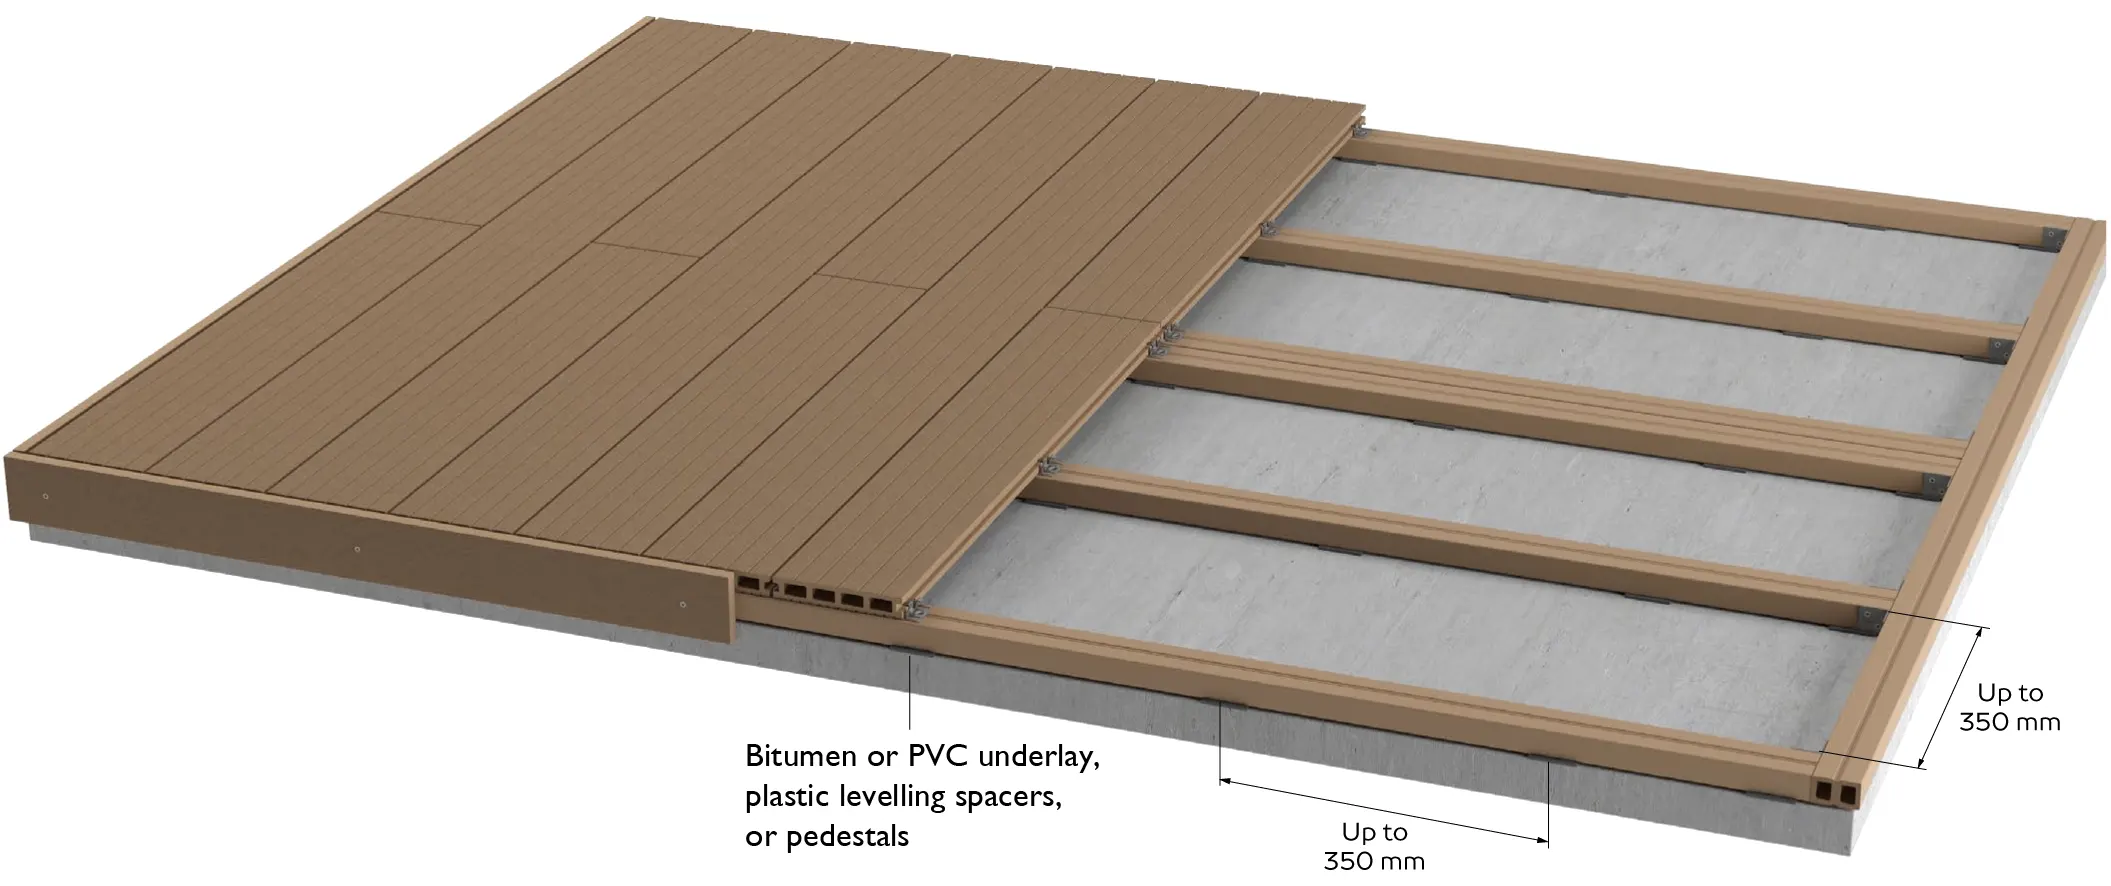
Suitable support beams should be placed at a maximum of 350mm centres. When laid directly on the substrate, in order to ensure drainage of water, rubber base pads, plastic or bitumen sheets must be placed between the beams and the substrate at intervals of 350 mm.

Where one decking board ends and another begins, two beams  should be installed side by side with a gap of up to 40mm so fixing clips can be placed away from the edges of the boards. 


When mounting the beams on pedestals these should be placed at 350mm centres along each beam.

Outermost beams should be installed so that the decking board does not extend more than 30mm beyond the edge of the beam. 

Note: The base construction should be built to ensure the decking has a slight slope (5mm/m) to avoid the build up of surface (rain)water.

DRILLING

Most of the boards we supply are designed to be fixed using concealed clips. However, for solid boards which require fixing with screws, it is always necessary to pre-drill the screw holes into the WPC material.


The drilled hole should be smaller than the diameter of the screw. For instance, for a 4mm diameter screw, the drill should have a 3mm diameter. During the sawing process the drill should occasionally be drawn out of the drilling hole, to remove any sawdust.


For fixing of edge profiles, screw holes should be pre-drilled using the same process as previously described.

TYPICAL INSTALLATION OF DECKING BOARDS

  1. The first decking board should be fixed with a starter clip (as illustrated). Alternatively, to create a flat outer edge, use an edgeboard which has a channel underneath for a starter clip.
  2. Subsequent boards should be fixed using fixing clips.
  3. The final board should be fixed with a screw diagonally at the edge, or right through in the middle, of the board. Leave a 30 mm space between the board end and the securing position.
  4. Leave a 5mm space between planks, edge boards, walls or other objects.
  5. To enable uniform expansion of the boards, all boards should be fixed with one screw (at the mid-point of the board) inserted diagonally from the edge.
Starter and Fixing Clips

RECOMMENDED INSTALLATION PATTERNS

Note: edgeboards can be added wherever you wish to clad the edge of your deck.

CARE AND MAINTENANCE

Dakota Living’s WPC decking is incredibly low-maintenance, especially compared to traditional wood decks. You’ll never need to spend time or money on staining, oiling, or sealing. To keep your deck looking beautiful, all that’s needed is a simple periodic cleaning with a brush, soapy water, and a sponge or pressure washer.

INSTRUCTIONS FOR MAINTENANCE

  1. Dust and dirt. To remove dust and dirt, the surface should be regularly cleaned with water and a brush, by wiping in the same direction as the pattern of the decking board. To remove ingrained dirt, use a pressure washer, and if necessary use soapy water.
  2. Plants and leaves. Loose dirt should be removed with a brush and the deck cleaned with water. For ingrained material, use a pressure washer, and if necessary use soapy water or a weak aqueous solution of 2% oxalic acid.
  3. Removing snow and ice. Snow and ice can be removed with a brush or plastic spade. To melt ice, road salt (calcium chloride or sodium chloride) can be used. Note: do not use a metal spade or other tools which could damage the surface.
  4. Salt residue. Loose salt residue should be removed with a brush before cleaning the boards with water. To remove stains use mild washing detergent* and warm water. For ingrained salt, the surface must be fully dry before removing any salt residue using fine sand paper.
  5. Rust. Remove loose material with a brush and clean the deck with water. To remove stains use detergent and warm water. For ingrained marks use an aqueous solution with a low level of oxalic or phosphoric acid and then soak with water.
  6. Cement. Remove cement pieces with a brush and then wash the deck using a pressure washer. Use a detergent and warm water to remove the stains. For more serious damage, let the surface dry properly and then remove cement using fine sand paper.
  7. Food and drink stains. Soapy water, or a detergent* containing acetone or methanol are suitable for cleaning before brusing in parallel with the decking board pattern. For ingrained stains let the surface dry properly, before removing using fine sand paper and if necessary use a detergent.
  8. Paint and oil stains. Use soapy water, or a detergent* containing acetone or methanol to clean before wiping with a brush in parallel with the decking board pattern. For ingrained marks, let the surface dry properly, before removing stains using fine sandpaper. If necessary use detergent. If working with paint or anything that could stain the deck, be sure to fully cover the surface before starting the work.
  9. Mould. To prevent mould the surface should be regularly cleaned and washed. To remove mould use a pressure washer and wipe with a brush in parallel to the decking board pattern. For ingrained mould, use soapy water or special anti-mould detergents that are readily available.
  10. Scratches. Lighter scratches will vanish over time. To remove deeper ones, use fine sandpaper rubbing in parallel with the decking board pattern.

PLEASE NOTE:

  1. Always use detergents with a neutral pH to clean your deck. Stronger detergents can alter the surface colour.
  2. Never use industrial chemicals to clean your deck, as they can permanently bleach or damage the surface.
  3. To prevent scratching, only use a soft bristled brush when cleaning the surface.
  4. *Detergents containing oxalic acid and/or methanol should only be used at low concentrations. If necessary, decrease the concentration by adding more water to the solution.
  5. Only use sandpaper with grit levels between 40 and 100. Do not use sanding machines!
  6. Never sand surfaces with a wood pattern. Sanding removes the relief surface permanently.
  7. When using a pressure washer, keep the nozzle at least 300mm away from the surface of the deck to prevent any damage.